Hello World
First canvas to confirm everything's wired up. ~5 minutes. No real robot required, this is pure simulation.
The wiring
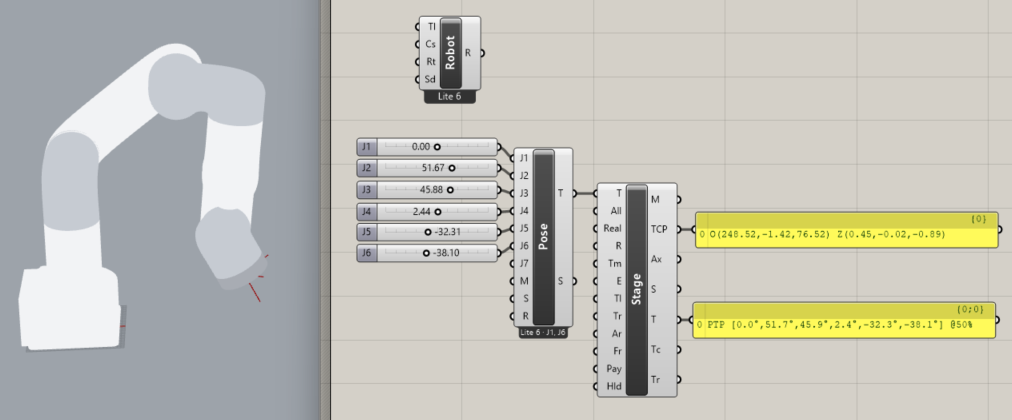
Six sliders (J1 to J6) drive a Pose, which feeds Stage. Stage previews the robot in the viewport and outputs the TCP plane, a status panel, and the targets.
Step by step
- Drop a Pose component (→ Targets).
- Add 6 Number Sliders. Set each from -180 to +180 with a default of 0. Connect them to J1 through J6.
- Drop a Stage component (→ Visualization). Wire Pose's Target output to Stage's Targets input.
- You should now see a stick-figure arm at the world origin, joint spheres + link cylinders, all at the home pose.
- Drag the J2 slider to 30°. The shoulder pitches forward. Drag J5 to -45°. The wrist bends. Congrats, you have a working forward-kinematics sim.
Make it pretty
- On the Stage component, add a Boolean Toggle to the Real Meshes input. Double-click the toggle to set it true.
- Stick figure becomes the actual Lite 6, white body, silver flange. Zoom in, rotate the viewport, drag the sliders again. This is what uFactory's product page looks like, mirrored in Rhino.
What if I see only spheres + cylinders? Real Meshes is off.
All 5 supported arms ship visual STLs embedded in the .gha, so just toggle Real
Meshes on. For your own custom STLs see Real meshes.
Try a Cartesian target
- Drop a Plane component (Vector → Plane → XY Plane). Wire a Construct Point with X=250, Y=0, Z=300 into its Origin input.
- Drop a PTP component. Wire your Plane into Target.
- Wire PTP's Target output into Stage's Targets input (replace the Pose wire, or keep both as a list).
- The arm should now reach to that point. Stage's TCP output is the resolved tool plane.
Next: connect to a real robot.