Core components: Pose + Stage + Robot + Workspace
These four components are the backbone of almost every Egret canvas. Once you
can wire them together you can pose an arm, watch it move, pick which model
you're driving, and see where it can reach — all in pure simulation, no
hardware required. This is the written companion to the "02 Pose + Stage +
Robot + Workspace" walkthrough.
The mental model. Robot says which arm.
Pose builds a target for that arm. Stage
shows the arm at that target. Workspace shows the whole
reachable volume. Robot is optional everywhere (everything defaults to a
Lite 6), but wiring it explicitly keeps DOF, joint limits, and meshes correct
across the canvas.
The four components
RobotsRobot
Pick a uFactory robot model. No inputs — right-click the
component to choose Lite 6 / xArm 5 / xArm 6 / xArm 7 /
UF 850 (the chosen model shows on the component's message line). There are also
per-model draggable pickers in the same Egret › Robots
subcategory if you prefer to drop a fixed "Lite 6" or "xArm 7" tile.
| Output | Nick | Meaning |
|---|
| Robot | R | Selected robot model. Wire into the Robot input of Pose, PTP/LIN/CIR, Stage, Workspace, etc. |
TargetsPose
Builds a uFactory move command from joint angles (degrees). This is your
joint-space target.
| Input | Nick | Default | Meaning |
|---|
| J1–J6 | J1–J6 | 0 | Joint angles in degrees. (J6 is ignored on xArm 5.) |
| Motion | M | PTP | Motion type: PTP or LIN. |
| Speed | S | 50 | Speed percent (1–100). |
| Gripper | G | optional | Gripper state (true = open). Leave unconnected to keep the previous state. |
| J7 | J7 | 0 (opt) | Joint 7 angle — xArm 7 only. |
| Robot | R | Lite 6 (opt) | Wire a Robot component to target another model. |
| Output | Nick | Meaning |
|---|
| Target | T | The robot target — feed this into Stage, a motion component, or codegen. |
| Status | S | Validation message (limits, model mismatches, etc.). |
VisualizationStage
The digital-twin viewport. Give it one or more targets and it draws the arm at
that pose, right in the Rhino viewport (auto-preview — no Custom Preview
needed).
| Input | Nick | Default | Meaning |
|---|
| Targets | T | — | List of targets to visualize. Uses the last one as the live pose. |
| Show All | All | false | Overlay every pose in the list (ghost mode). |
| Real Meshes | Real | false | false = stick figure (spheres + cylinders); true = the actual arm STLs. |
| Robot | R | Lite 6 (opt) | Model to draw. |
| Time | Tm | (opt) | Scrub value to interpolate along a multi-pose program. |
| Output | Nick | Meaning |
|---|
| Robot Meshes | M | One mesh per link, transformed to the current pose. |
| TCP | TCP | Tool-flange plane at the last pose. |
| TCP Axes | Ax | Lines for the TCP X/Y/Z axes. |
| Status | S | Reachability / joint-limit status. |
| Targets / Current Target | T / Tc | Pass-through of the targets and the one being shown. |
VisualizationWorkspace
Samples reachable TCP positions for the selected robot by sweeping J1–J3.
Use it to see the arm's reach envelope so you can place your work inside it.
| Input | Nick | Default | Meaning |
|---|
| Samples | N | 8 | Samples per joint. 8 → 512 points, 16 → 4096. Clamped 2–24. |
| Robot | R | Lite 6 (opt) | Model to sample. |
| Output | Nick | Meaning |
|---|
| Reachable TCP | P | Sampled TCP origin positions (mm) — a point cloud of where the flange can go. |
| Bounding Box | B | Axis-aligned bounding box of that cloud. |
| Status | S | Sample count + bounding-box extents. |
Wire it up
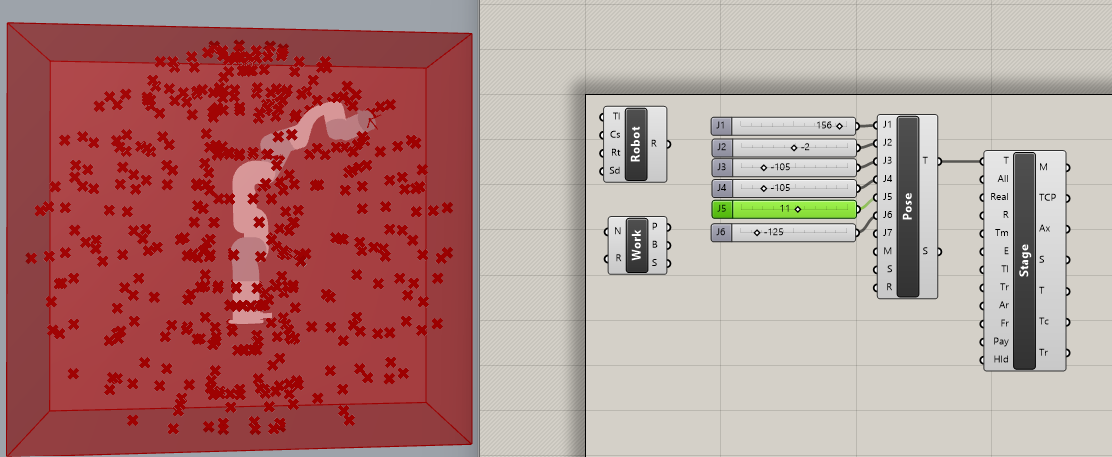
Step by step
- Drop a Robot component (Egret › Robots).
Right-click it and pick your arm — e.g. Lite 6 or xArm 7.
Its message line shows the choice.
- Drop a Pose (Targets). Add 6 Number Sliders
(−180 to +180, default 0), rename them J1…J6, and wire them in.
Wire Robot → Pose's Robot input.
- Drop a Stage (Visualization). Wire
Pose's Target → Stage's Targets, and
Robot → Stage's Robot. You'll see a stick-figure arm at the
world origin.
- Drag J2 to 30° and J5 to −45° — the arm moves live. Put a
Panel on Stage's Status to watch reachability/limit messages.
- Add a Boolean Toggle to Stage's Real Meshes
input, set it true — the stick figure becomes the real arm.
- Drop a Workspace (Visualization). Wire
Robot → its Robot input and set Samples to 8.
It draws the reachable point cloud + bounding box, so you can see exactly where
this arm can work.
Why wire Robot everywhere? Every component defaults to a Lite 6
if its Robot input is empty. If you're on an xArm or UF 850, an unwired Robot
input means the wrong DOF, joint limits, and meshes. Pick the model once on a
Robot component and fan its output out to Pose, Stage, and
Workspace so the whole canvas agrees.
Stage uses the last target. When you feed Stage a list of
targets it animates/shows the last one. Turn on
Show All to overlay every pose as ghosts, or drive the
Time input to scrub along a multi-step program.
Next: drive it from real joint moves and Cartesian targets in
Hello World, give Stage its own scrub UI in
Stage, control surface, then
connect to a real robot. Every component's full
parameter list lives in the component reference.